1. Navigate to http://zoom.butler.edu.
2. Sign in with your Butler credentials. (Full email address and password)
3. click on the Schedule icon. This will open the scheduler window.
4. Select meeting settings from this window. Shown is an example:
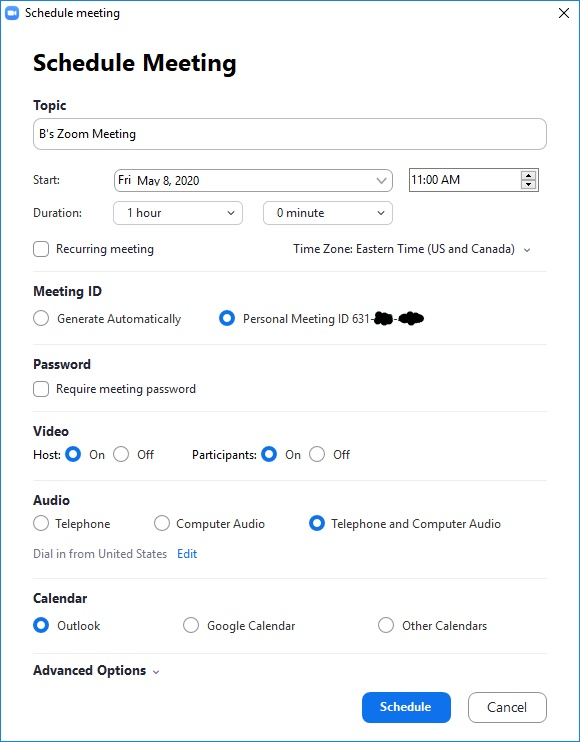
5. Fill in the different fields according to preference. Here are brief descriptions of each field:
- Topic: Enter a topic or name for your meeting.
- Start: Select a date and time for your meeting. You can start your meeting at any time before the scheduled time.
- Duration: Choose the approximate duration of the meeting. This is only for scheduling purposes. The meeting will not end after this length of time.
- Time Zone: By default, Zoom will use your computer's time zone. Click the drop-down menu to select a different time zone.
- Recurring meeting: Choose if you would like a recurring meeting (the meeting ID will remain the same for each session).
- Meeting ID: Choose Generate Automatically to let Zoom generate a unique Meeting ID for the scheduled meeting OR choose Personal Meeting ID to let Zoom use the scheduler's Personal Meeting Room for the scheduled meeting.
- Password: Check this box to set a password for the meeting.
- Video:
- Host: Choose if you would like the host video on or off when joining the meeting. Even if you choose off, the host will have the option to start their video.
- Participants: Choose if you would like the participants' videos on or off when joining the meeting. Even if you turn off, the participants will have the option to start their video.
- Audio: Choose whether to allow users to call in via Telephone only, Computer Audio only, Both, or 3rd Party Audio (if enabled for your account).
- Calendar: Select a calendar service to add the meeting to and send out invites to participants.
- Outlook: This will generate an .ics file that will open in Outlook, Windows Mail, or iCal.
- Google Calendar: Will launch the user's default browser and open the invite in Google Calendar.
- Other Calendars: Will open a new window, where the meeting text can be copied pasted into the user's preferred communication method.
- Advanced Options: Click on the arrow to view additional meeting options:
- Enable Waiting Room: If this is selected, participants will enter a "waiting room" before they can officially join the meeting. The host can determine who is allowed to enter using the Participants Panel.
- Enable join before host: This allows participants to join the meeting before the host does.
- Mute participants on entry: Checking this box automatically mutes participants’ audio when they join the meeting. Participants will be able to unmute themselves at any time.
- Only authenticated users can join:
- Sign in to Zoom: Checking this box means that participants will only be able to join the meeting if they are logged in to a valid Zoom account.
- Butler Authenticated Users Only: checking this box means that participants will only be able to join if they are logged in as a Butler Authenticated User (having a valid Butler email address).
- Automatically record meeting: If checked, the meeting will begin recording as soon as it starts. Two options are currently available:
- Locally: Locally record to the host's device.
- In the cloud: Record to the Zoom cloud server.
- Alternative hosts: (optional), Enter the email addresses of other licensed participants who the host scheduler will allow to serve as hosts if the scheduler (original host) is unable to join.
- Type of Use: optionally select from this dropdown a description of usage for the meeting.
6. Click
Schedule to finish and open the selected calendar service to add the meeting.
- If a Recurring meeting is scheduled, host will need to set the recurrence in their calendar service.
- Choosing Other Calendars will allow the host to cop and paste the scheduled meeting info such as date, time, and meeting URL.